


 Este obra está bajo una licencia de Creative Commons Reconocimiento-NoComercial-CompartirIgual 4.0 Internacional.
Video tutorial
Tutorial
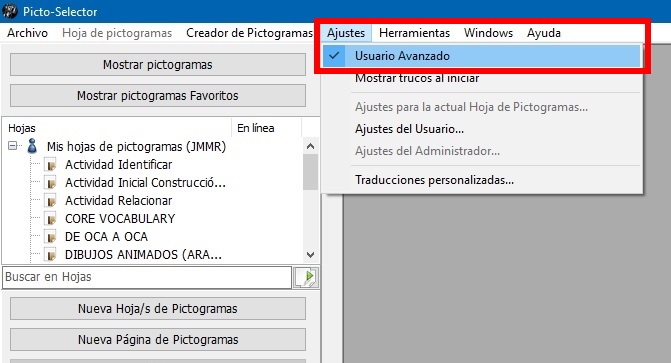
Before starting to work with Picto Selector,we must activate the Advanced User option that we will find in the Settingsmenu. This activation will give us access to many of the features that we will explain in the following chapters.
Once activated, we can now create our first pictograms Sheet.
Throughout these chapters we will verify that the author facilitates the entire process of creating and adapting materials, facilitating access to the same option from different menus of the application. When you learn to use the application, you will decide how you access all these options.
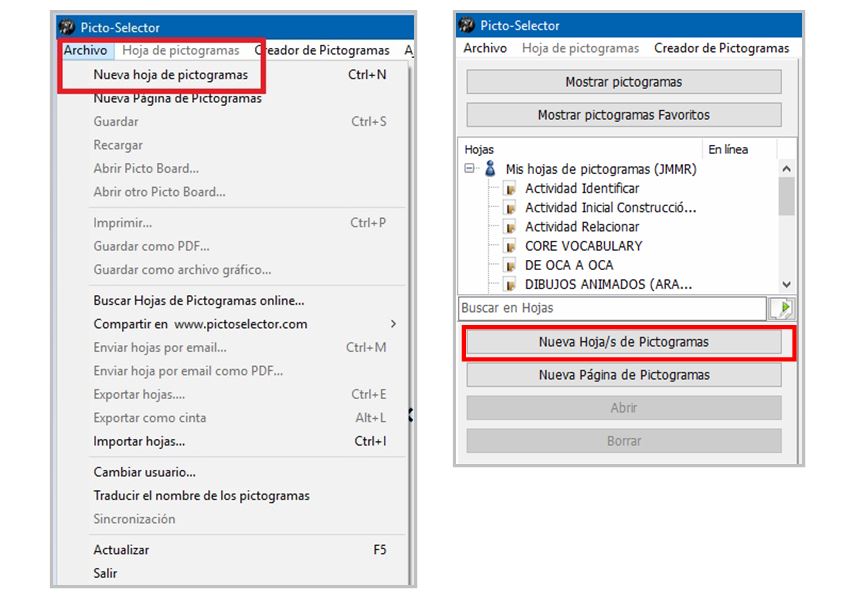
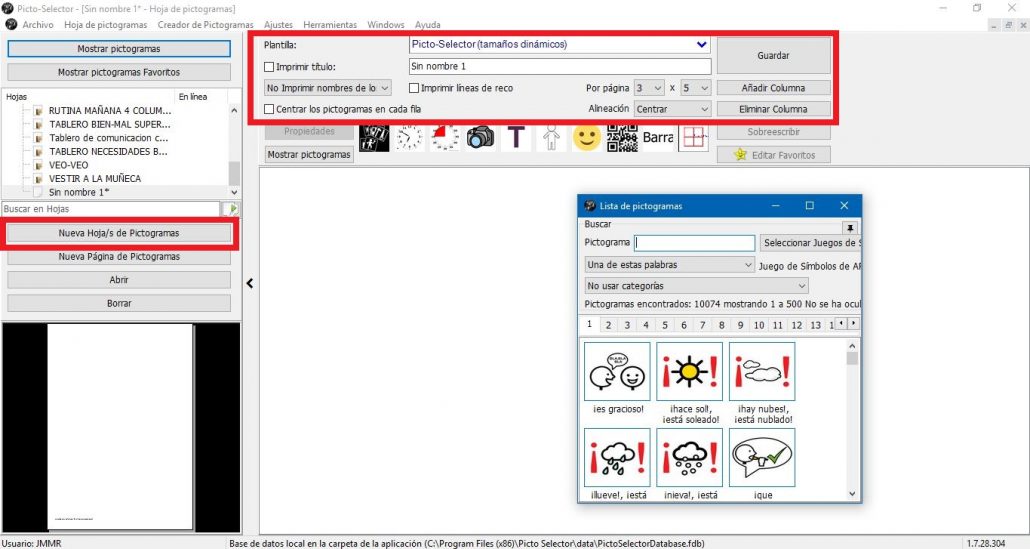
We are going to create a new sheet of pictograms and, as we have mentioned, you can activate this option from two different places in the application. We show it in the next screenshot.
We explain all the steps to follow.
1. Create new pictograms sheet
As soon as this option is selected, a Wizard for creating pictogram sheets appears that will make our work easier the first time we start the application.
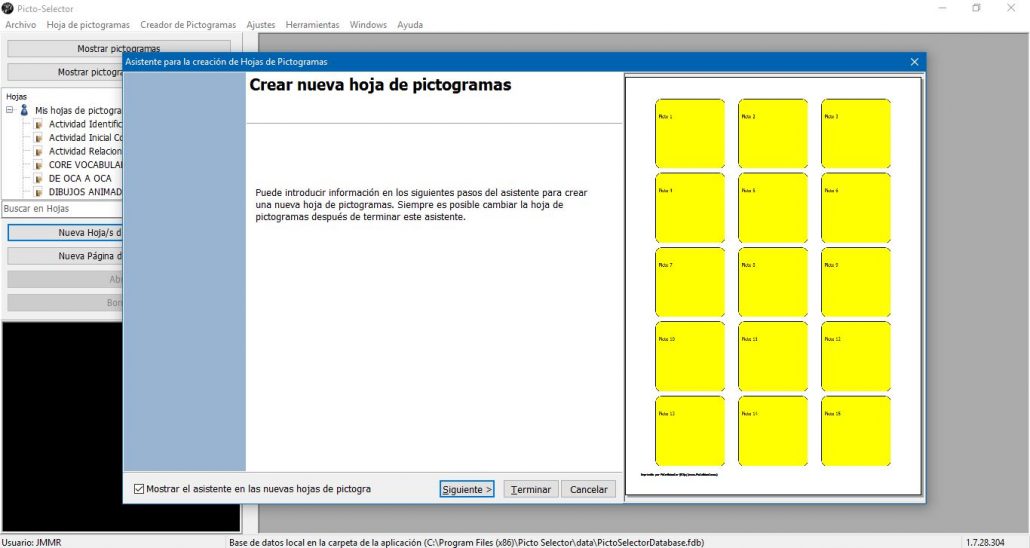
This wizard can be finished immediately if we click on the Finishbutton, although it will continue to appear again on all occasions that you proceed to the creation of a new sheet of pictograms.
If you already manage the application and do not need the wizard, we can permanently deactivate it by removing the stick from the option Show the wizard in the new pictogram sheets, located at the bottom left of the pop-up window. For now, we recommend that you use it to familiarize yourself with the application.
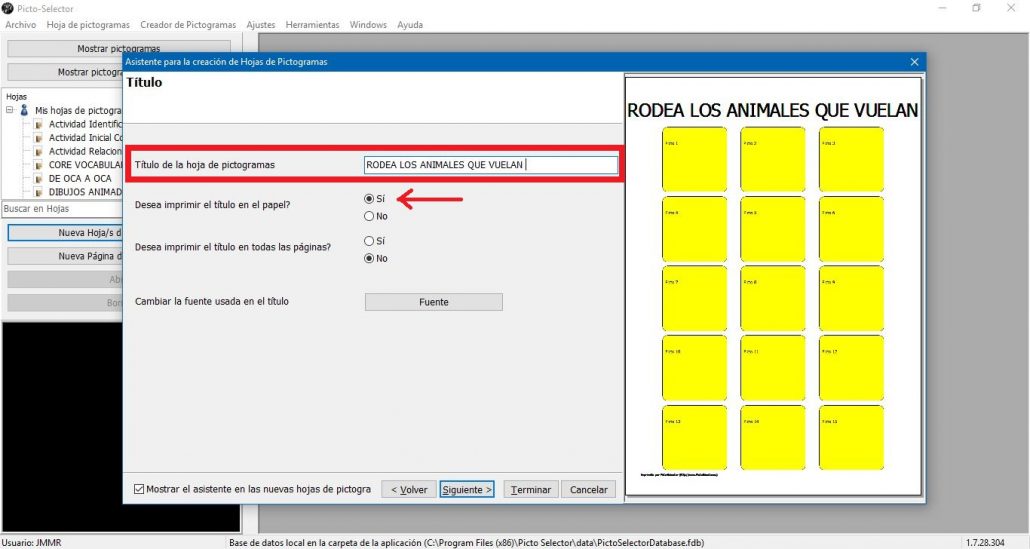
2. Pictogram sheet title
Let’s start our assistant, clicking on the Next button and see that the first screen that appears is the Titlescreen. Here we are going to enter the Title of the pictograms sheet. If you want the title of your sheet to appear, you must select Yes in the option You want to print the title on the paperand, in the case that you are going to create several sheets, you have the option to Print the title on all pages. Finally, you can select the Font of the text among all those you have installed on your computer.
In our example, we are going to create a single sheet, print the title, and use the Arial font. In the window on the right, we can see in the Previewthe aspect that our sheet of pictograms is taking.
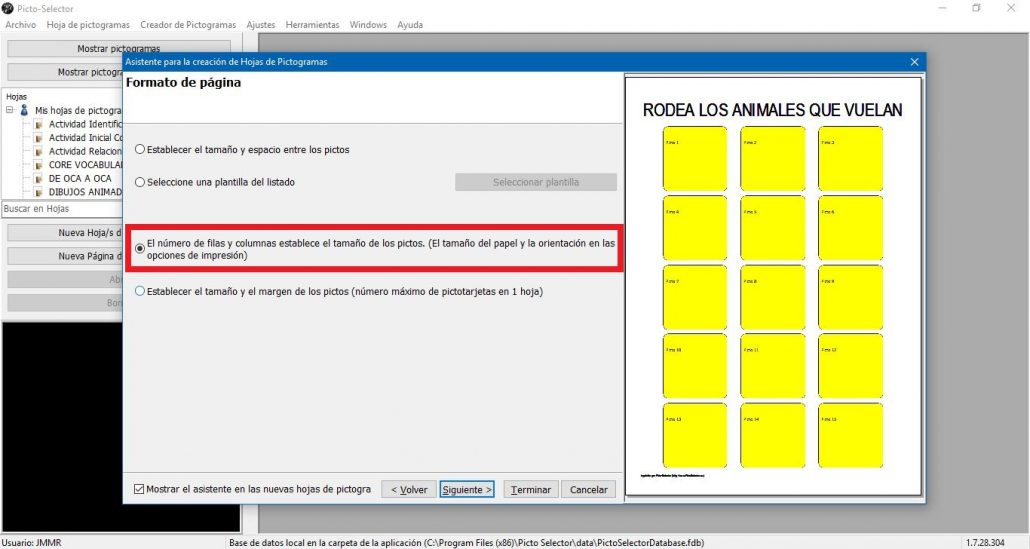
3. Page layout
On the next screen of our wizard, we are going to set thePage Layout for our pictograms sheet. We have four configuration options, although we recommend that, initially, you use the option that is established by default and that we explained to you first.
3.1 The number of rows and columns establishes the size of the picts (INITIALLY RECOMMENDED OPTION)
On this occasion we recommend that you use the option that comes by default, The number of rows and columns establishes the size of the pictograms, although we are going to explain how to configure the other options.
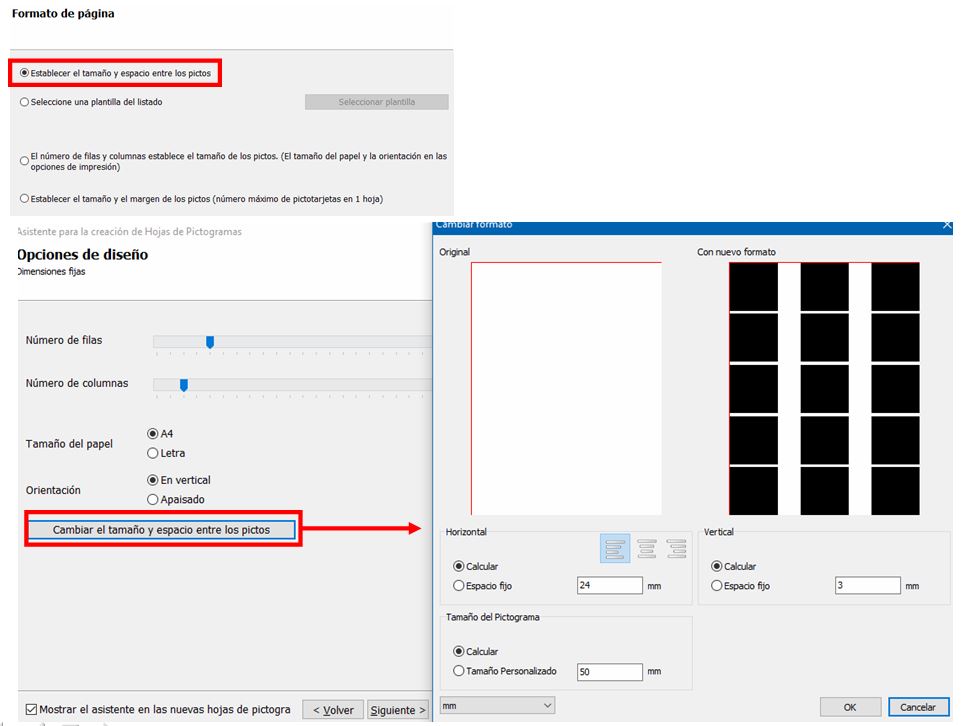
3.2 Set the size and space between pictograms
If you select the first option, we canset the size and space between the pictograms and adapt it to your needs. Once this option is selected, when you click on the Nextbutton, the Design Options screen appears and at the bottom we select Change the size and space between the Pictograms. Here we leave you a small montage of the two pages with the different options.
3.3 Select a template from the list
If we select the second option, Select a template from the list,we can access different types of templates for physical communicators such as GoTalk, Supertalker, Voicepal, Step by Step, BigPoint, etc. We will also find templates to create materials such as communication boards, cubes, bingos, vocabulary repertoires, morphosyntactic structuring, etc.
Here is a selection of the most representative templates:

Board 1 large cell + 8 small

Board 1 large cell + 11 small

Board 1 large cell + 14 small

Board 1 large cell + 20 small

Board 1 large cell + 36 small

1 central image + 22 around – Untitled

1 central image + 18 around – Title with image

Bingo 2×3

Bingo 3×3

Bingo 4×4

1 large upper central image + 3 small lower ones – With title

1 large upper central image + 4 small lower ones – With title

1 large upper central image + 5 small lower ones – With title

1 large top center image + 3 right + 3 left + 3 bottom – With title

Cube

1 Center Image + 3 Top + 3 Bottom – No Title

Dobble / Spot-it 4

Dobble / Spot-it 6

Step by Step – 12 cm
In the list we choose the desired template.
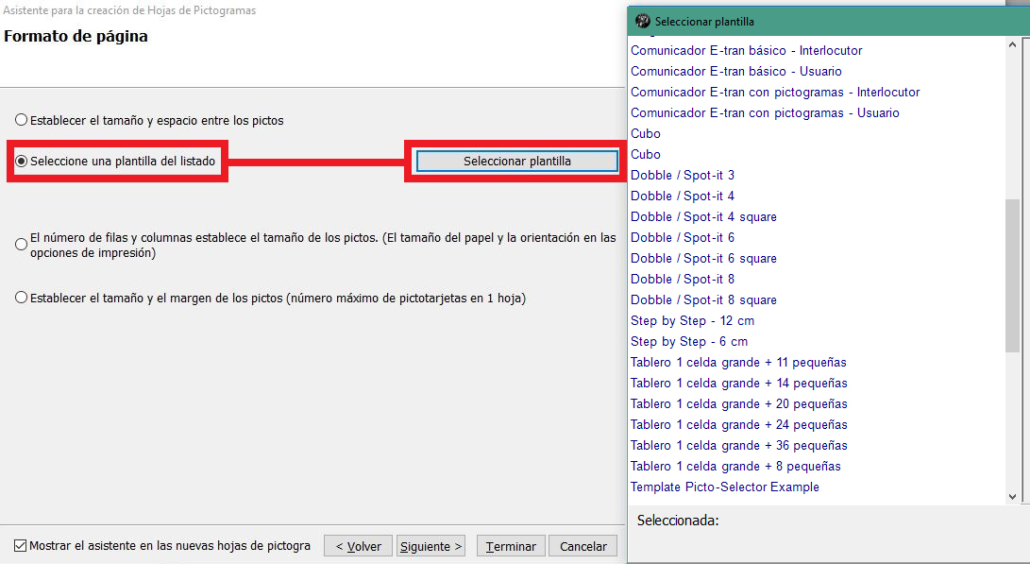
Once we have chosen the template we want to work with, we would go on to the next step (4) “Design options”.
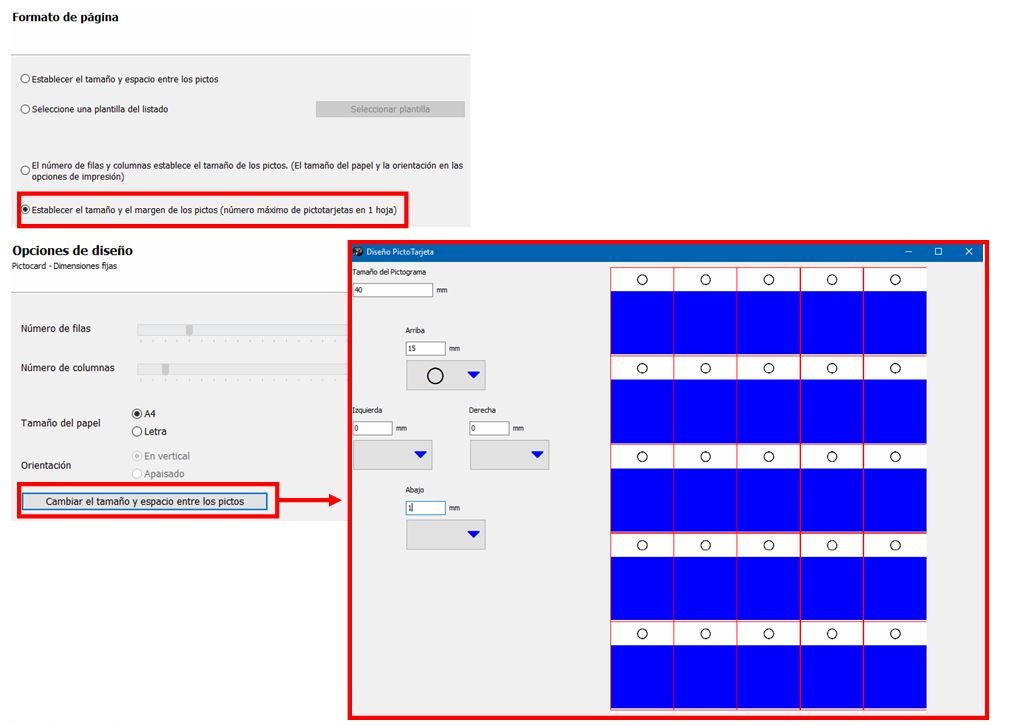
3.4 Defina o tamanho e a margem da foto (número máximo de pictocards em 1 folha)
If we select the fourth option, Set the size and margin of the picts (maximum number of pictotarjetas in 1 sheet),we can adjust all the options of your pictogram sheet, including the size of the same.
4. Design options
In our case, we will use the first option The number of rows and columns sets the size of the Picts.
By clicking on the Nextbutton, we access the Design Options. On this screen, we will define the Number of Rows and the Number of Columns, the Paper Size and the Orientation.
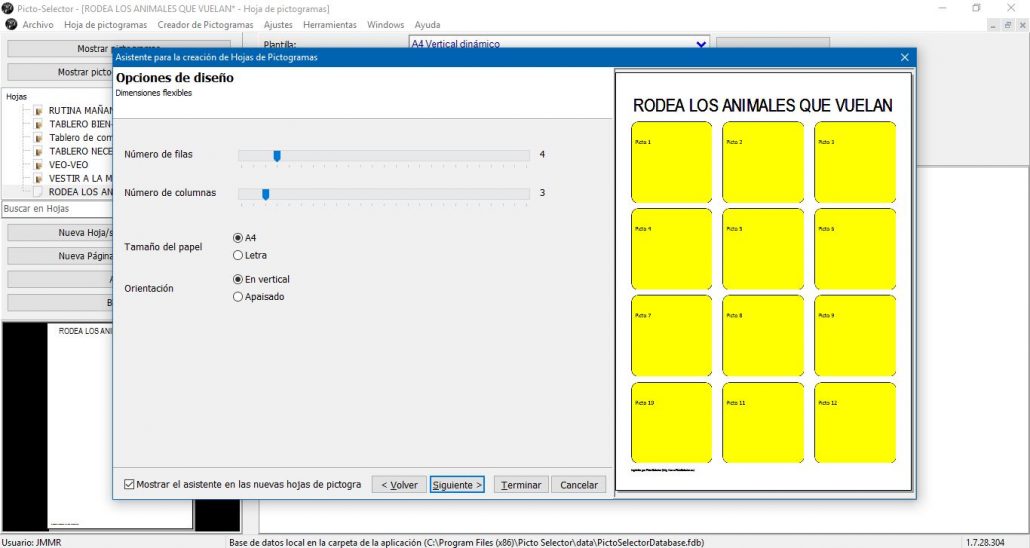
In our example, we have changed the number of rows to four instead of five.
5. Description of the Pictograms
This screen of the wizard offers us a large number of options to print the name of the Pictograms. In this case, we recommend that you try to place the name in the different positions offered by the wizard and preview them in the box on the right.
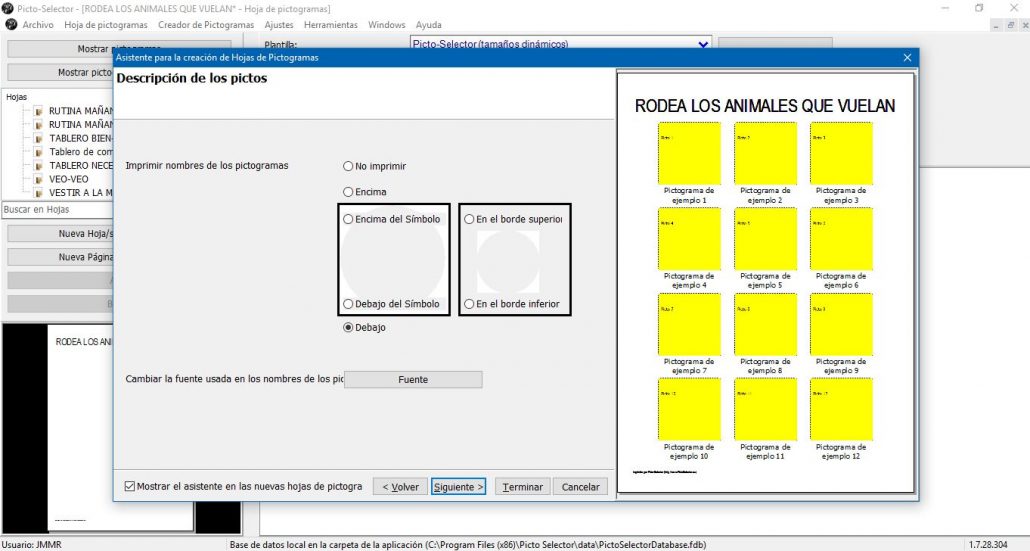
In the example, we have chosen the option Below and as thefont of the name of the pictograms we have selected Arial. We can select a different font for the name of the pictograms and the name of the title.
6. Pictogram’ s border
Finally, this final screen of the wizard offers us several possibilities in terms of the type of Border of the pictograms.
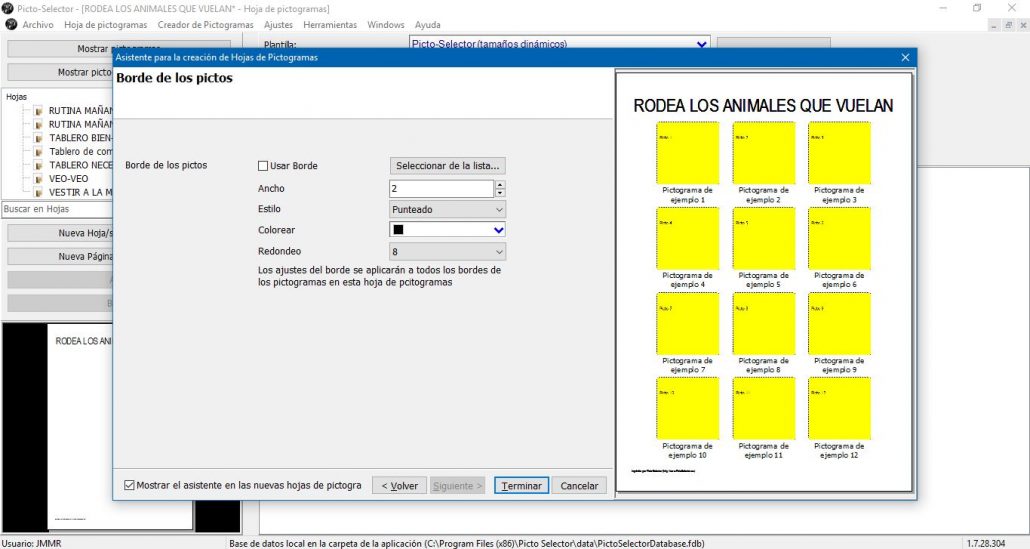
If we do not want to use border in the pictograms, as we are going to do in our example, we deactivate the stick of the Use Border option and it will disappear automatically.
If we are going to use border, we leave this option activated and configure the Width,the Style,the Color and the degree of Rounding. We recommend, as in the two previous points, that you carry out a test and observe the preview to familiarize yourself with this section.
A very interesting option is the pictogram border style, because it allows us to create pictograms with striped or dotted borders, which will be very useful for printing boards in which we are going to create pictograms to cut out and paste on other pages. .
It is also recommended that you test the edge rounding option, since we can configure pictograms with an almost round shape.
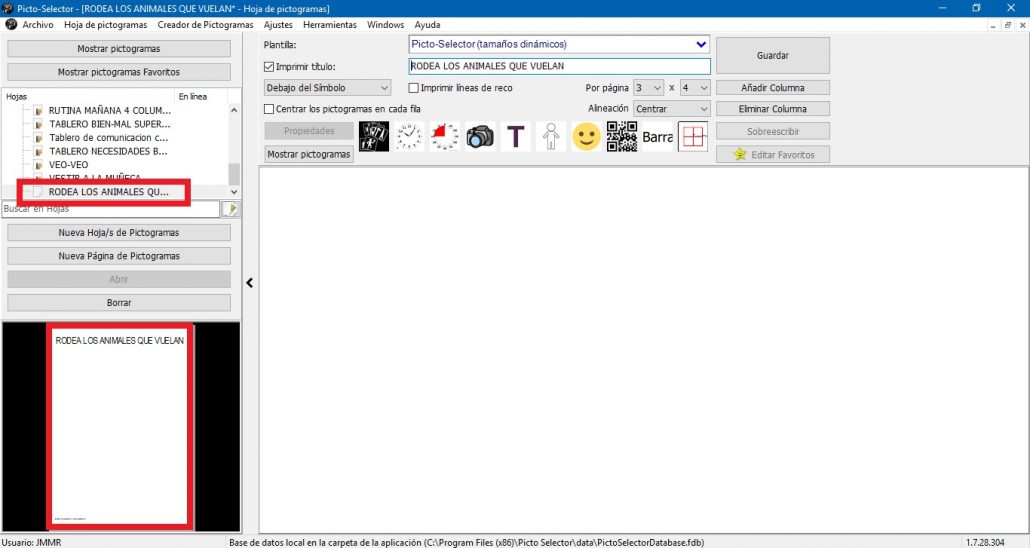
Once all the options have been configured, click on the Finish button andfinish the wizard.
And here you have the Picto Selector screen that will appear with the name of the pictogram sheet in the Sheets box and with the Preview in the lower left.
In the event that you become regular users, you can ignore this wizard and create your sheet of pictograms from using the different options from the application interface.
Surely some details will surprise you, but we will explain them to you in the next chapter.


